For provincial digital contests (North Shore and Lions Gate), the goal is to submit an image that is as large as possible without violating the size constraints defined in the contest rules.
This guide is for Photoshop. If you are using a different photo editor then you may have an equivalent resizing method but you'll have to find it yourself.
It is assumed that you are starting out with an image that is much larger than allowed by the contest rules.For example, the contest rules might specify a size limit of 1024 x 768 pixels, but the image from your camera might be 3000 x 2000 pixels or more, depending on the resolution of your camera.
If you are starting with an image that is smaller than the contest rules, then it is NOT advisable to submit it for competition because the resolution will be too poor and it will look blocky when shown on the projector.(However it may be OK if the low resolution was done on purpose to achieve an artistic objective.)
Resizing should be the final step in preparing the image for competition. Other editing tasks such as cropping, level adjustment, etc. should be done before resizing.(The only exception is sharpening, since you may need to sharpen the resized image -- see note below.)
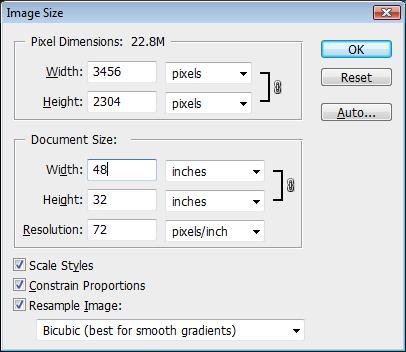
The following is an example of how to resize in Photoshop. For discussion purposes, this example assumes that the contest rule is to have images no larger than 1024 x 768. Please note that rules may vary from one contest to another, so you can just follow this example and replace 1024 x 768 by whatever the rule is for your contest.
Make sure your colour working space is set to sRGB, because that is how competition projectors are calibrated. Normally this is the default for Photoshop so if you haven't changed it then there's nothing to worry about.If you want to check the working space, click on Edit -> Colour Settings.
If your digital camera has a colour space setting, you may want to set it to sRGB to make it easier for processing images in the future.However, if you prefer to work in RGB because of its wider colour gamut, then you can convert a copy of the image to sRGB using the Edit -> Convert Profile command in Photoshop.
Re-sharpen your image if necessary (Filter -> Sharpen -> Unsharp Mask). Do not over-sharpen, because that will create artifacts in your image.Be particularly careful when sharpening for nature competitions, because images must look as natural as possible.
Save your image as jpeg, highest quality.You should save it under a different name, you should NOT overwrite your original image.